 |
| This is the May-June 2015 Issue |

Thanks for taking the time that you do to check out my blog, follow my blog, and leave feed back.
Beçk¥
|
| This is the May-June 2015 Issue |
 |
| Finished product. Step by step and supplies are listed below. |
 |
The supplies I used for this project are chicken wire, rope, small zip ties, a pair of scissors, and hay. |
 |
| To begin I used chicken wire that is 24 inches long, and cut a length of approx. 40 inches. I created a circle with it, over lapped the ends about two inches and zip tied it secure in multiple sections. You could twist the ends of the chicken wire to secure your circle if you dont want to use zip ties. When you are done with this step you will want the zip tied end at the bottom so birds do not get poked. |
 |
| Once you move to this step you will pinch the lower part of the circle together (about 2 inches up), and zip tie that together tightly. This will create a cradle effect for the bedding to stay in the house. |
 |
| Here you can see how I have the bottom section pinched closed and secured. You will do this to both ends. |
 |
| You can see this is the bare bones of the house. |
 |
| Now you can stuff the cradle area with hay. Pack it in nicely so when the birds walk inside they will feel secure and they wont be in danger of stepping through to the chicken wire. |
 |
| For a photo of what the nest would look like I added a few small balls in there. |
 |
| This is one of the nests secured in a tree. I put both of these nests in the crotch branches of a tree that are leaning over the water of my pond. |
 |
| Here is the other that I have secured in the branches over water. I used rope to tie it to a few different places on branches to keep it level and safe. |


 |
| This could nearly be a free project. This is a piece of driftwood from Lake Huron on the Tawas Bay. |
 |
| This is Sarah picking up and carrying the large piece of driftwood from the beach near a shipwreck that occurred in the late 1800's |
 |
| She chose to buy the coat hooks from Home Depot. She paid $4.00 for each hook. It looks beautiful. (if you wanted to go cheaper or free, you could use large nails or screws just as well) So her investment in this project is approximately $25.00 Beçk¥ |
 |
| This project was a birthday gift for my sister from her son. I really had him do as much as he could, and he was very proud of his work. |
 |
| This project consisted of 6 pallet boards that I cut into different sizes to give it a puzzle look instead of a brick stagger look. The flat sheet of wood is what we screwed each pallet board onto and attached large hooks on the back. |
 |
| My nephew made the pattern he was happy with on the flat board and we screwed all the pallet pieces to it. This is him sanding the edges nice and smooth. |
 |
| He chose to stain each board a different color to give it a more rustic look. He also decided the pattern of the stain being applied as well. The stain colors are Oak, Driftwood, Kona, and clear. I know staining all the boards would be easier to do when it is taken apart, but this was his project and he felt happy doing it this way. |
 |
| After the stain was dry he chose a color of paint (a teal green) and decided to paint some arrows on it. His family is a very active outdoor family so this was something that would go well in their home. |
 |
| We decided to attach a couple extra Whitetail antlers that I had so items can be hung from them. This photo is just an idea of how she can decorate it in her home. Hopefully she will send me a picture of it decorated how she likes and I will post it below. My nephew was very proud of his work, and did a great job. Beçk¥ |
 |
| Costs of this project. The unit itself was picked from the trash and that equals free. The clark and Kensington paint usually runs $6.00 for the sample cans but in March they were all .99 cents. (I used half the sample can), the stain was $.6.00, and the annie sloan soft wax was given to me so I have no idea how much that would typically cost, but I know annie sloan is expensive and I am a cheap wad, so if I didn't have it on hand I just would not have used it. |
 |
| This was a book shelf-storage shelf that I picked out of someones trash and brought it home. It's been sitting in my barn for a few years waiting for me to do something with it. It is solid wood, and part of it has a very old dark green paint on it. Very ugly! |
 |
| I started by cleaning it up really good, and I stained the wood with a stain color called drift wood. I added a coat of Clark and Kensington satin enamel called Velvet Curtains. |
 |
| This was after the 2nd coat of Velvet Curtains paint. I decided that I wanted to stain to be darker so I stained over it with a stain color called Kona. I like it darker much better. I used old brushed nickel cupboard handles that I had in a jar in the barn from a previous house we owned. |
 |
| This is the finished product. I went over the entire thing, including the Velvet Curtains color paint with a dark soft wax by annie Sloan. The wax helped to tone down the brightness of the daylight paint. |
 |
| It now sits in my hunting prep room and holds some of our camo gear and other hunting supplies. It matched my gun case also. |
 |
To mount the heads I had some scrap wood in my barn so I stained it a drove a 2 inch screw through the backside, so the skull can hang on the protruding part of the screw. The back of the skull of the deer has a deep hole where the brain would've been so the screw slides into it perfectly. |
 |
| This is the buck one up close. I added some small metal decorative corners to the wood |
 |
| Here is the finished product with a small latch on the back to be hung on the wall. They are neat conversation pieces, and they were found while out shed hunting with our children. |
 |
| Finished Project, I love that my wax warmer illuminates the deer at night. |
 |
| I started with tongue and Groove boards |
 |
| I got all my paint for free from a few weekends of free quartz of painted being given away at Ace Hardware. I just rubbed the paint on with a paper towel. |
 |
| After I painted each slat, I put them together, and sanded all the edges and some of the front. Then I found a stencil I liked and used my projection machine to blow up the image an the boards. You can barely see that I traced a deer onto it in this photo. |
 |
| This is me painting the deer in black. |
 |
| This is the finished product. Price: Free. Slats were givin to me for free, the colored paint was free from the hardware. Win win for me! Thanks, ßeçk¥ |

 |
| The mirror I used. |
 |
| I only used shells with the gold bottoms, I hot glued them gold end to the inside, |
|
| This is the finished product hanging on the wall. Turned out awesome! ßeçk¥ |
 |
| First I hot glued about two hundred shells together by gluing two inch string from the inside of one empty shell to the other empty shell. Make about two hundred sets like this. |
 |
| I bought a wreath frame from Michaels (around $3.00), I looped each shell through the middle and dangled a set over the inside and again over the outside of the frame. |
 |
| You can see the frame has four frame wires. I hot glued the strings into place so when I lifted it to hang it everything didn't slide downward. |
 |
| This is the backside of it. I also tied a ton of little tweed type bows around the inside and outside to hide any green frame from showing, but to also give it a bit more of a rustic look. |
 |
| I hung it on a wall for display. You can see from gluing the shells in place all the shells stay in place all the way around pretty evenly and you can see the tweed string a bit throughout the inside and outside. I finished it with a Burlap bow. I really like it. I suppose you could wind some lights into it if you want, I kept it pretty simple. Thank You for checking it out. ßeçk¥ |
 |
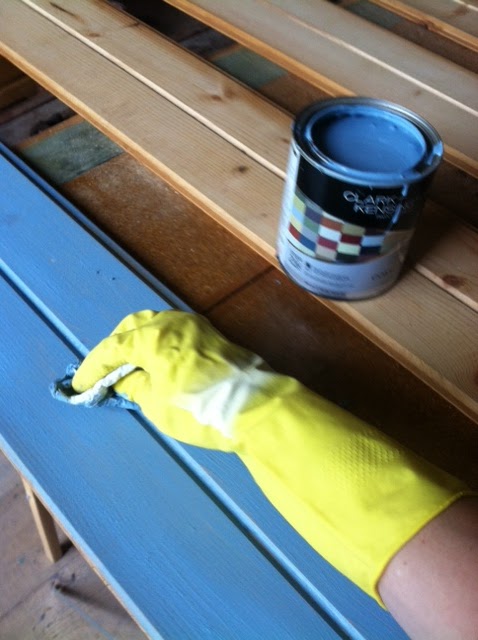
| I put two coats of paint on this project. |
 |
| I put all my projects on these plastic stilts to keep everything up off the floor. You could use blocks or anything, its really helpful. |
 |
| Using the Valspar I was able to give it an older look. |

 |
| The finished product turned out great. It now sits in my sweet nephews bedroom filled with baby supplies! |